在服务器Ubuntu22.04系统下的
HivisionIDPhotos部署
HivisionIDPhotos部署
欢迎使用我们公司服务器来部署和使用HivisionIDPhotos大模型。通过本指南,您将学会如何在Ubuntu 22.04系统下安装和配置HivisionIDPhotos大模型,并使用webui进行交互。如果您对我们的服务器感兴趣,可以在官网处获取服务器资源,我们还提供详细的部署帮助文档,帮助您轻松上手。
HivisionIDPhotos介绍
HivisionIDPhotos是一款功能全面的AI图像处理工具,它免费且开源,由SOTA AI模型驱动。这款工具最初名为Lama Cleaner,支持从图片中删除任何不需要的对象、缺陷、人物或擦除和替换任何东西。HivisionIDPhotos支持多种AI模型,包括擦除模型和扩散模型,能够执行擦除、修复或取消绘制任务,同时提供丰富的插件支持,如Segment Anything、RemoveBG、Anime Segmentation、RealESRGAN、GFPGAN和RestoreFormer等 。它具备强大的自托管能力,可以在多种硬件环境下运行,包括基于CPU的计算系统、利用GPU加速运算,甚至在苹果公司的Apple Silicon芯片架构下也能完美运行。HivisionIDPhotos还提供了完善的WebUI操作界面,允许用户通过鼠标键盘操作图片编辑,并使用最新的AI模型来编辑图像 。
项目地址:https://github.com/Sanster/HivisionIDPhotos
部署框架
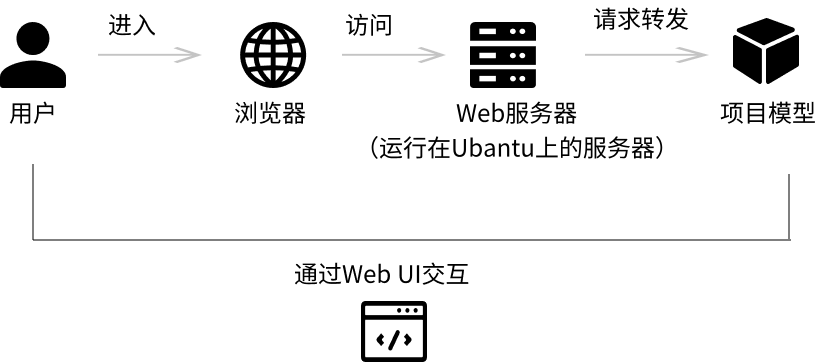 在这个框架中,每个组件都有其特定的角色和功能,它们通过Web UI这个桥梁相互连接,共同为用户提供服务。用户通过浏览器与Web服务器交互,而Web服务器则负责与后端的HivisionIDPhotos模型进行通信,以完成图片生成的任务。
 • 用户(User):
用户是最终与系统交互的人,他们使用Web UI来生成图片。
• 浏览器(Browser):
用户通过浏览器访问Web服务器。浏览器充当客户端,发送HTTP请求并接收响应。
• Web服务器(Web Server):
运行在Ubuntu服务器上的软件,通常是Web框架的一部分,比如Flask或Django。它处理来自浏览器的HTTP请求,提供Web UI,并与后端服务交互。
• HivisionIDPhotos模型(HivisionIDPhotos Model):
HivisionIDPhotos模型提供了一个设计简洁、操作简单的Web用户界面,用户可以通过浏览器访问并使用这些AI模型来编辑图片,使得图像编辑变得更加简单、高效 。
• Web UI(Web User Interface):
用户通过Web UI与系统交互。Web UI是Web服务器提供的前端界面,允许用户上传图片、设置生成参数等。
HivisionIDPhotos模型的优点和缺点
HivisionIDPhotos 模型具有以下一些优点和缺点:
• 优点:
功能全面:支持擦除、修复、扩展和内容生成等多种图像编辑功能,满足不同用户在不同场景下的需求 。
AI驱动的智能性:利用SOTA AI模型,HivisionIDPhotos能够自动识别和修复图像问题,提供智能且高效的编辑体验 。
支持多平台:兼容性好,支持包括Windows、macOS和Linux在内的多种操作系统 。
用户界面友好:HivisionIDPhotos的WebUI操作界面简洁直观,易于上手,使得用户可以快速理解并使用各种工具 。
丰富的插件系统:提供多种插件,增强了软件的功能性和应用范围 。
• 缺点:
新工具的局限性:作为新兴工具,可能在某些特定功能上不如一些成熟的商业软件完善 。
缺少高级功能:对于高级用户,可能缺少一些定制化或高级的编辑功能 。
性能要求:在处理高分辨率大图像时,可能需要较高的硬件性能,否则可能会遇到处理速度慢的问题 。
部署流程解释介绍
1. 购买 GPU 服务器
• 在官网购买并配置服务器:
 • 操作系统选择:
选择一个适合您需求的操作系统,通常推荐使用 Ubuntu 22.04 LTS,因为它提供了长期支持和稳定性。
• 购买和部署:
完成购买流程,启动服务器,并进行初步配置。
FinalShell是一款服务器管理工具,支持SSH和远程桌面,使用FinalShell远程连接配置服务器。
二、Ubuntu 22.04基本环境配置
• 更换Ubuntu镜像源:
通常为了加速下载,可以更换到国内镜像源,如清华镜像源。
• 更新包列表:
使用sudo apt update命令来更新软件包列表。
• 安装CUDA:
CUDA是用于通用并行计算的编程模型和API,需要根据显卡型号选择合适的版本安装。
• 环境变量配置:
配置环境变量以确保系统能够正确使用CUDA和显卡驱动。
三、安装miniconda环境
• 下载miniconda3:
从官网下载miniconda3的安装脚本。
• 安装miniconda3:
执行下载的脚本进行安装。
• conda配置:
配置conda的通道、环境等。
四、部署HivisionIDPhotos
• 克隆仓库:
使用git clone命令从GitHub克隆HivisionIDPhotos仓库。
• 创建虚拟环境:
使用conda或python的venv模块创建虚拟环境。
• 安装依赖:
安装所需的Python库和工具。
• 设置清华源、更新pip:
更换pip的源到清华,以加速下载。
• 启动服务
修改配置文件或启动命令,以指定HivisionIDPhotos服务运行的端口号。
部署流程概述
更换源和更新:优化软件包管理器使用的源,确保软件包列表是最新的。
安装显卡驱动和CUDA:确保GPU能够被系统识别并用于高性能计算。
配置环境变量:让系统知道如何找到并使用新安装的软件。
安装miniconda:创建一个独立的Python环境,避免不同项目间的依赖冲突。
安装HivisionIDPhotos:获取HivisionIDPhotos的代码,创建适合其运行的环境,并准备好所需的模型文件,最终启动HivisionIDPhotos服务。
• 在官网购买并配置服务器:
• 操作系统选择:选择一个适合您需求的操作系统,通常推荐使用 Ubuntu 22.04 LTS,因为它提供了长期支持和稳定性。
• 购买和部署:
完成购买流程,启动服务器,并进行初步配置。
FinalShell是一款服务器管理工具,支持SSH和远程桌面,使用FinalShell远程连接配置服务器。
二、Ubuntu 22.04基本环境配置
• 更换Ubuntu镜像源:
通常为了加速下载,可以更换到国内镜像源,如清华镜像源。
• 更新包列表:
使用sudo apt update命令来更新软件包列表。
• 安装CUDA:
CUDA是用于通用并行计算的编程模型和API,需要根据显卡型号选择合适的版本安装。
• 环境变量配置:
配置环境变量以确保系统能够正确使用CUDA和显卡驱动。
三、安装miniconda环境
• 下载miniconda3:
从官网下载miniconda3的安装脚本。
• 安装miniconda3:
执行下载的脚本进行安装。
• conda配置:
配置conda的通道、环境等。
四、部署HivisionIDPhotos
• 克隆仓库:
使用git clone命令从GitHub克隆HivisionIDPhotos仓库。
• 创建虚拟环境:
使用conda或python的venv模块创建虚拟环境。
• 安装依赖:
安装所需的Python库和工具。
• 设置清华源、更新pip:
更换pip的源到清华,以加速下载。
• 启动服务
修改配置文件或启动命令,以指定HivisionIDPhotos服务运行的端口号。
部署流程概述
更换源和更新:优化软件包管理器使用的源,确保软件包列表是最新的。
安装显卡驱动和CUDA:确保GPU能够被系统识别并用于高性能计算。
配置环境变量:让系统知道如何找到并使用新安装的软件。
安装miniconda:创建一个独立的Python环境,避免不同项目间的依赖冲突。
安装HivisionIDPhotos:获取HivisionIDPhotos的代码,创建适合其运行的环境,并准备好所需的模型文件,最终启动HivisionIDPhotos服务。
部署具体流程
一、FinalShell的下载及使用:
FinalShell是一款服务器管理工具,支持SSH和远程桌面,提供多标签管理、命令自动提示、SFTP、性能监控等功能,适用于开发运维,界面友好,在很大程度上可以免费替代XShell。
FinalShell的下载:https://www.hostbuf.com/t/988.html
FinalShell的基本使用:
连接Linux服务器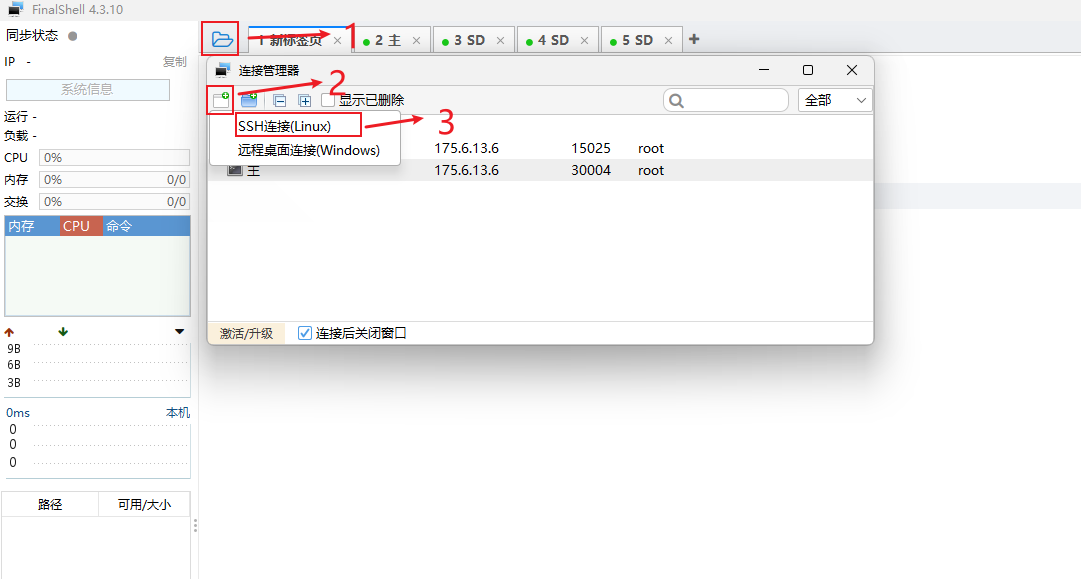 进行如下设置:
名称: 自定义
主机: 填写你的服务器的公网IP
端口: 填写服务器端口
备注: 自定义
方法: 密码
用户名:默认是root
密码: 填写服务器的登录密码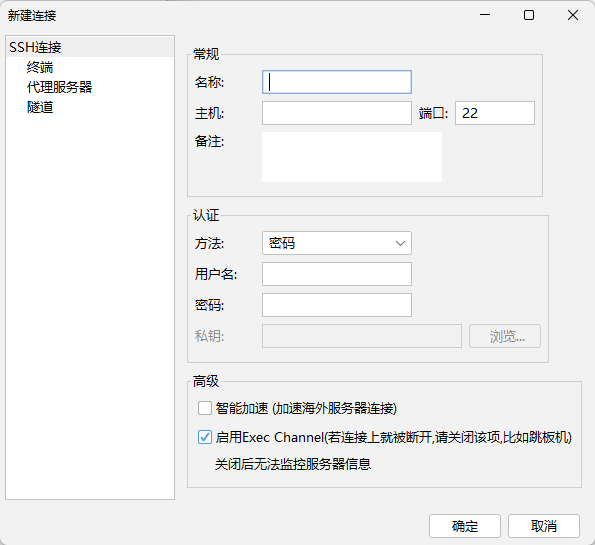 新建完后双击或者右键点击连接
二、ubuntu22.04基本环境配置
1.更新包列表
•修改配置文件
将原有的内容注释(每行最前面加#)
在最后添加以下内容
更新软件列表 更新本地软件 更新时间较长,请耐心等待
2. 安装GPU驱动程序
•这个命令会列出您的系统硬件信息,以及推荐的驱动程序版本
这里的4090建议安装 nvidia-driver-535 驱动程序 安装完成后,请务必重启您的系统,以便新的驱动程序生效。
3.查看显卡信息

4.下载并安装 CUDA 12.3
•访问 NVIDIA CUDA Toolkit 下载页面,选择 CUDA 12.3 版本。对于 Ubuntu,您可能需要运行类似以下的命令:
•设置环境变量: 编辑 vi ~/.bashrc 文件,添加以下行:
•应用环境变量更改:
•验证安装:
三、安装miniconda环境
1. 下载miniconda3
2. 安装miniconda3
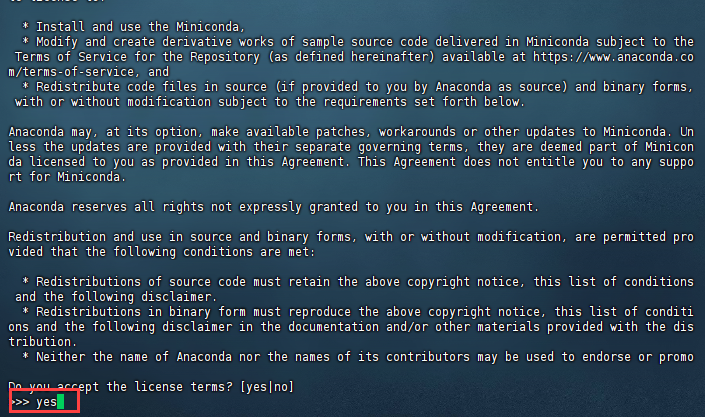 直接一直enter键,到输入路径和yes
这边建议路径为:miniconda3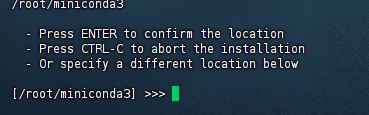 直接回车enter即可,再次输入yes
  成功安装
成功安装 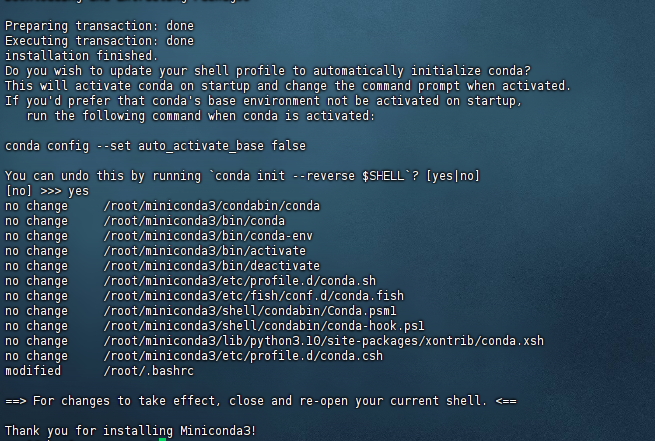
3. 打开用户环境编辑页面 点击键盘I键进入编辑模式,在最下方输入以下代码
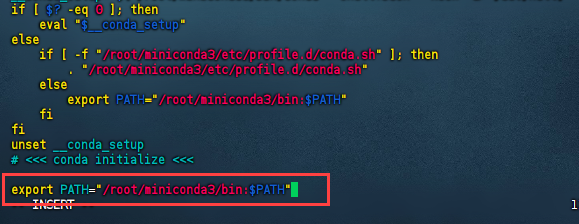 按esc键退出编辑模式,输入:wq保存并退出
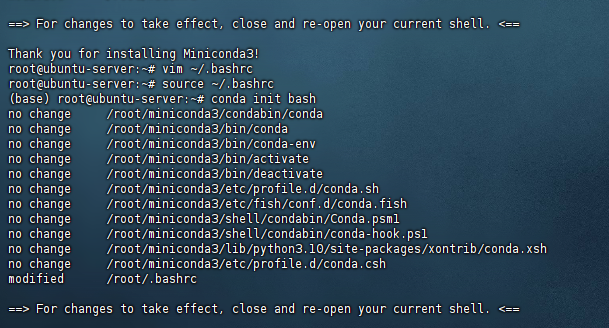
4. 重新加载用户环境变量

• 初始化conda
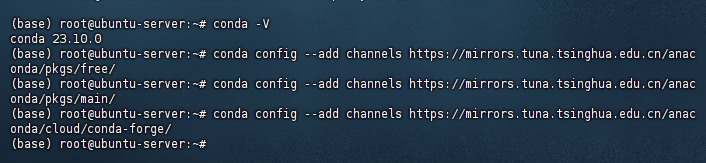
5.conda配置
• 配置清华镜像源
• 设置搜索时显示通道地址

• 配置pip 镜像源

6. 创建HivisionIDPhotos需要的环境
四、部署HivisionIDPhotos
1.克隆仓库
github克隆 国内github镜像克隆 进入目录 安装依赖
2.下载权重文件
方式一:脚本下载
方式二:直接下载
存到项目的hivision/creator/weights目录下:
•modnet_photographic_portrait_matting.onnx(24.7MB): MODNet官方权重, 下载
•hivision_modnet.onnx(24.7MB): 对纯色换底适配性更好的抠图模型, 下载
•rmbg-1.4.onnx(176.2MB): BRIA AI 开源的抠图模型, 下载后重命名为'rmbg-1.4.onnx'
•birefnet-v1-lite.onnx(224MB): ZhengPeng7开源的抠图模型, 下载后重命名为'birefnet-v1-lite.onnx'
3. 启动服务
port变量为设置服务器监听的端口为业务端口,此处改为业务端口。
启动成功后,访问http://主机IP:端口
FinalShell是一款服务器管理工具,支持SSH和远程桌面,提供多标签管理、命令自动提示、SFTP、性能监控等功能,适用于开发运维,界面友好,在很大程度上可以免费替代XShell。
FinalShell的下载:https://www.hostbuf.com/t/988.html
FinalShell的基本使用:
连接Linux服务器
进行如下设置:名称: 自定义
主机: 填写你的服务器的公网IP
端口: 填写服务器端口
备注: 自定义
方法: 密码
用户名:默认是root
密码: 填写服务器的登录密码
新建完后双击或者右键点击连接二、ubuntu22.04基本环境配置
1.更新包列表
•修改配置文件
vi /etc/apt/sources.list在最后添加以下内容
# 默认注释了源码镜像以提高 apt update 速度,如有需要可自行取消注释
deb https://mirrors.tuna.tsinghua.edu.cn/ubuntu/ jammy main restricted universe multiverse
# deb-src https://mirrors.tuna.tsinghua.edu.cn/ubuntu/ jammy main restricted universe multiverse
deb https://mirrors.tuna.tsinghua.edu.cn/ubuntu/ jammy-updates main restricted universe multiverse
# deb-src https://mirrors.tuna.tsinghua.edu.cn/ubuntu/ jammy-updates main restricted universe multiverse
deb https://mirrors.tuna.tsinghua.edu.cn/ubuntu/ jammy-backports main restricted universe multiverse
# deb-src https://mirrors.tuna.tsinghua.edu.cn/ubuntu/ jammy-backports main restricted universe multiverse
# 以下安全更新软件源包含了官方源与镜像站配置,如有需要可自行修改注释切换
deb https://mirrors.tuna.tsinghua.edu.cn/ubuntu/ jammy-security main restricted universe multiverse
# deb-src https://mirrors.tuna.tsinghua.edu.cn/ubuntu/ jammy-security main restricted universe multiversesudo apt-get updatesudo apt upgrade2. 安装GPU驱动程序
•这个命令会列出您的系统硬件信息,以及推荐的驱动程序版本
ubuntu-drivers devicessudo apt update
sudo apt install nvidia-driver-535reboot3.查看显卡信息
nvidia-smi4.下载并安装 CUDA 12.3
•访问 NVIDIA CUDA Toolkit 下载页面,选择 CUDA 12.3 版本。对于 Ubuntu,您可能需要运行类似以下的命令:
wget https://developer.download.nvidia.com/compute/cuda/repos/ubuntu2204/x86_64/cuda-ubuntu2204.pin
sudo mv cuda-ubuntu2204.pin /etc/apt/preferences.d/cuda-repository-pin-600
wget https://developer.download.nvidia.com/compute/cuda/12.3.0/local_installers/cuda-repo-ubuntu2204-12-3-local_12.3.0-545.23.06-1_amd64.deb
sudo dpkg -i cuda-repo-ubuntu2204-12-3-local_12.3.0-545.23.06-1_amd64.deb
sudo cp /var/cuda-repo-ubuntu2204-12-3-local/cuda-*-keyring.gpg /usr/share/keyrings/
sudo apt-get update
sudo apt-get -y install cuda-toolkit-12-3
•设置环境变量: 编辑 vi ~/.bashrc 文件,添加以下行:
export PATH=/usr/local/cuda-12.3/bin${PATH:+:${PATH}}
export LD_LIBRARY_PATH=/usr/local/cuda-12.3/lib64${LD_LIBRARY_PATH:+:${LD_LIBRARY_PATH}}
•应用环境变量更改:
source ~/.bashrc•验证安装:
nvcc -V三、安装miniconda环境
1. 下载miniconda3
wget https://mirrors.cqupt.edu.cn/anaconda/miniconda/Miniconda3-py310_23.10.0-1-Linux-x86_64.sh2. 安装miniconda3
bash Miniconda3-py310_23.10.0-1-Linux-x86_64.sh -u这边建议路径为:miniconda3
直接回车enter即可,再次输入yes 成功安装 3. 打开用户环境编辑页面
vim ~/.bashrc export PATH="/root/miniconda3/bin:$PATH"4. 重新加载用户环境变量
source ~/.bashrc• 初始化conda
conda init bash5.conda配置
• 配置清华镜像源
conda config --add channels https://mirrors.tuna.tsinghua.edu.cn/anaconda/pkgs/free/
conda config --add channels https://mirrors.tuna.tsinghua.edu.cn/anaconda/pkgs/main/
conda config --add channels https://mirrors.tuna.tsinghua.edu.cn/anaconda/cloud/conda-forge/
• 设置搜索时显示通道地址
conda config --set show_channel_urls yes• 配置pip 镜像源
pip config set globalThis.index-url https://pypi.tuna.tsinghua.edu.cn/simple6. 创建HivisionIDPhotos需要的环境
conda create -n HP python=3.9
conda activate HP
四、部署HivisionIDPhotos
1.克隆仓库
github克隆
git clone https://github.com/Zeyi-Lin/HivisionIDPhotos.gitgit clone https://mirror.ghproxy.com/https://github.com/Zeyi-Lin/HivisionIDPhotos.gitcd HivisionIDPhotospip install -r requirements.txt
pip install -r requirements-app.txt2.下载权重文件
方式一:脚本下载
python scripts/download_model.py --models all方式二:直接下载
存到项目的hivision/creator/weights目录下:
•modnet_photographic_portrait_matting.onnx(24.7MB): MODNet官方权重, 下载
•hivision_modnet.onnx(24.7MB): 对纯色换底适配性更好的抠图模型, 下载
•rmbg-1.4.onnx(176.2MB): BRIA AI 开源的抠图模型, 下载后重命名为'rmbg-1.4.onnx'
•birefnet-v1-lite.onnx(224MB): ZhengPeng7开源的抠图模型, 下载后重命名为'birefnet-v1-lite.onnx'
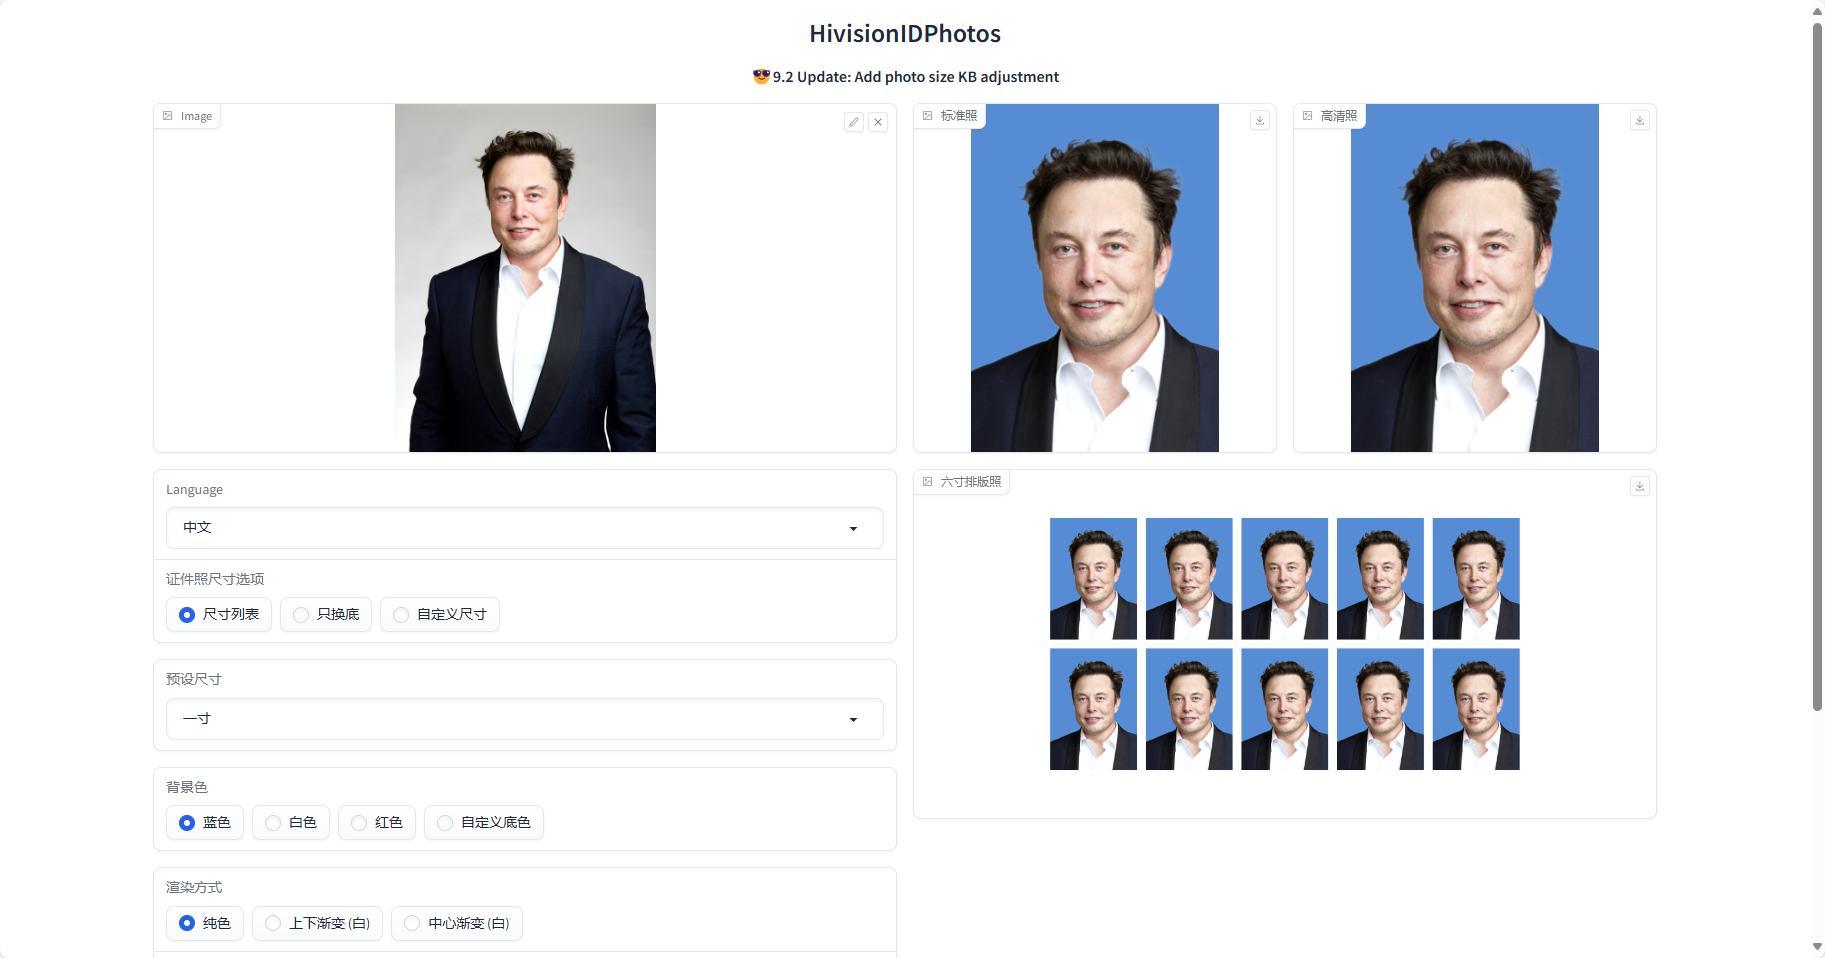
3. 启动服务
python app.py --host 0.0.0.0 --port 15120启动成功后,访问http://主机IP:端口